How to Install and Configure Altium
 |
This is a guide Welcome! This article is intended to guide you through an SSI process. While its authors have made efforts to make it useful, if you have questions, please ask the authors on Slack. They will be able to both help you and improve this resource for future SSI-ers. This article was written by Sasha Maldonado ( |
|---|
Background
Altium Designer is SSI's preferred circuit board design program. The program runs exclusively on Windows; Mac and Linux users have successfully run Altium through both dedicated Windows partitions and Windows virtual machines. Though debated amongst SSI members, a USB mouse is also a useful tool when designing circuit boards.
Altium Ltd. sponsors SSI with a number of shared licenses to use their software. These licenses are managed over the internet - after signing in for the first time, your computer will automatically download a license file every time you open Altium and release your license when you close the program.
Altium allows users to draw circuit schematics and then design the physical layout of the components represented in the schematic. This requires libraries of symbols to represent components, the physical dimensions of those components in real life, and links so that they can be purchased from suppliers. SSI and Stanford Solar Car Project members have designed parts for these libraries over the course of several years, and as an Altium user, you will almost certainly add parts to the SSI PCB libraries.
These libraries are shared and synchronized amongst all of SSI's Altium users using a version control technology called Subversion (typically "SVN"). SVN allows a group of folders (known as a "repository") to be shared selectively between SSI's Altium users, while tracking changes between versions of the files and allowing users to decide when they share changes they've made with the rest of the SSI userbase (sharing your changes is known as "committing" those changes). SSI's SVN is hosted online by a sponsor, Assembla.
Users familiar with git will find SVN familiar but notably different; SSI's reasons for using SVN over git are captured here.
Installation and Setup
Account Setup

Within the ![]() #altium
#altium ![]() @{{{display-name}}}
@{{{display-name}}}
Installing SVN
You will need SVN software to use the SSI Altium repository. The recommended choice is to install Tortoise SVN (Windows-only). Mac and Linux users who want SVN access from within their home OS are recommended to install SmartSVN, though we will not discuss its usage in this article.
TortoiseSVN will run persistently on your computer and allow you to work with files synchronized with the SVN. As shown at right, TortoiseSVN will appear as a menu available when right clicking on files or folders. We will introduce the most useful of these commands in this article; several more are discussed here (recommended reading after completing this guide).
Downloading SSI Altium Libraries


Find a convenient location on your computer (i.e. your desktop) to create a folder that will host all of the shared SSI Altium files. Create a new folder there (my folder is called "SVN-SSI-Altium"). Right click on the folder, and select "SVN Checkout" (see right). A window should pop up (see right) showing a URL to download files from and a location on your computer where the files will be downloaded. Verify that the target on your computer is where you intend and set the URL of the repository to http://subversion.assembla.com/svn/stanfordspaceinitiative, and click OK. You will then be prompted for your Assembla login - this will be your username (not email) and password for your Assembla account. Enter these, click OK, and your computer should begin to download the Altium libraries. These are rather large and will take several minutes.
If your credentials are not accepted (a rare but known problem), make sure they are correct, and then reset your password (not necessarily change it, simply reset it). The origin of this issue is unknown, but a password reset typically solves the problem. If it still doesn't work, log into Assembla and ask their 24-hour support for help with SVN authentication - they are typically very helpful and respond in around half an hour.
Installing Altium
Once you have an Altium account, Altium Designer can be downloaded here after logging in on the Altium website. Be aware that the software will only install on Windows operating systems. After downloading, install with the default settings.
Connecting Altium to the License System

After Altium finishes installing, open it. Under "My Account," click "Sign in" and log in with your Altium account. Check "Sign me in when I open Altium Designer," as this will automatically grant you license access when you start the program. Next, under "Available Licenses," select Altium Designer from the list of products (you may or may not have other options listed; you can safely ignore all other ones) and click "Use" underneath (see right). This will now happen automatically every time you open the program.
Open SSI Integrated Library

If you do not see the "Projects" panel of your Altium window (see image on right - if open, the panel is typically on the left side of your screen), you will need to open it. This can be done in "View → Workspace Panels → System → Projects," also accessible with the keyboard shortcut ![]() v → w → s → p
v → w → s → p
Once this panel is open, File → Open and navigate to the folder you set up for the Altium SVN. Enter, and go to "libraries/intlib." Inside, you should find "SSI.LibPkg" (whose file name may simply show up as "SSI"). Open the file; it should expand in your Projects panel, as shown at right.
Compiling the SSI Altium Library
With SSI.LibPkg open in your Projects panel, right click on SSI.LibPkg and hit "Compile Integrated Library SSI.LibPkg." This LibPkg file is an editable copy of all of the symbols, component footprints, and supplier links used for designing circuits and circuit boards in Altium; compiling it produces a non-editable version that can actually be used in circuit design. The compile process will take up all of Altium's resources and typically lasts between 30 seconds and 2 minutes. When done, you may see a "Messages" panel appear, which should indicate that you compiled successfully. Even if the Messages panel does not appear, you should be able to tell when the library finishes compiling based on a green progress bar in the lower left part of the screen.
If the Messages panel appears but errors show up (which is rare), message ![]() #altium
#altium
This step is important, as it is required every time you wish to update your copy of the library to include changes that others (or you) have made. You will likely do this a good number of times over the course of your Altium career.
Installing the SSI Altium Library

If you do not see the "Libraries" panel of your Altium window (if open, the panel is typically on the right side of your screen), you will need to open it. This can be done in "View → Workspace Panels → System → Libraries," also accessible with the shortcut ![]() v → w → s → l
v → w → s → l
Once the panel is open, click the "Libraries..." button in the upper left, bringing up a window as shown in the image at right. Go to the "Installed" tab, where a list of (typically two) default libraries will appear. These libraries are not built to SSI standards and no SSI projects use them. Click on each library in the list, and then click "Remove" in the lower right.
Next, click "Install..." and then "Install from file." A new file dialog will open up; from your Altium SVN folder, navigate to "libraries/intlib/Project Outputs for SSI," where you should find SSI.IntLib (which will again likely just appear as "SSI"). Select it, and it will install.
If you do not have a "Project Outputs for SSI" folder, your compile failed, and you will need to resolve the issue before proceeding.
Installing the Microsoft Access 2007 Driver
For reasons that are poorly understood, many SSI Altium users cannot use two additional libraries - one of resistors and one of capacitors - without first installing this Microsoft Office 2007 compatibility driver. This solution took considerable experimentation to discover and is a good example of SSI Tribal Altium Knowledge. Installing this driver, though demonstrably not required for all users, will prevent hard-to-diagnose future headaches.
Installing Resistor and Capacitor Database Libraries

Two kinds of parts - surface mount chip resistors and surface mount ceramic capacitors - are stored in separate "database" libraries because they come in several thousand very similar varieties which can be defined using a creatively formatted Excel sheet and are imported into Altium through a .dblib file. We will install these libraries in this step.
In the same window used to install SSI.IntLib (from the Libraries panel, "Libraries..." → "Installed" → "Install..." → "Install from file"), navigate to "libraries/dblib." You will initially see nothing there; to fix that, change the type of libraries visible from "Integrated Libraries *.INTLIB" to "Database Libraries *.DBLIB" (see right). Two files - "resistor" and "sscp" should appear; install both of them.
Formatting the Resistor and Capacitor DBLibs
We will now make sure the resistor and capacitor databases show the most useful information when you need to select a part from them. From the Libraries panel, click the dropdown menu and select "resistor.DbLib - Resistors$." A list of resistors will appear underneath it, with a number of column headings. Right click any column heading, and select "Select Columns." You will then bring up a window with a list of parameters in two columns; parameters in the left are not typically shown when searching through the database, while parameters on the right are. Using the "Add" and "Remove" buttons, set the three visible parameters to be "Resistance (Human readable)," "Package," and "description," and click OK. See photos below to accompany this step.
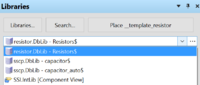
Your dropdown should look like this after completing all of the above installation. 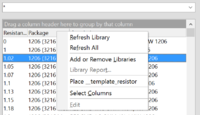
Right click on any column header under the dropdown. 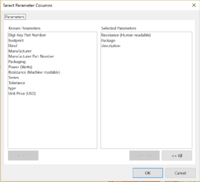
Once you're down moving parameters around, you should get this.


Now, from the dropdown, select "sscp.DbLib - capacitor$," and repeat the above steps to get to the Select Parameter Columns window. Move parameters around until the three parameters you have in the right column are "human_value," "Package," and "description." Click OK.
Optionally, repeat the steps for "capacitor$" with "capacitor_auto$." The "capacitor_auto$" section contains capacitors specially rated for automotive use, which are of obvious use to the library's creators (who, hint, build a car every two years) but are typically not important for SSI projects. "capacitor_auto$" does not have a "human_value" parameter.