Difference between revisions of "Releasing a Board for Manufacture"
Smaldonado (talk | contribs) |
Smaldonado (talk | contribs) (Added how to use outjob) |
||
| Line 13: | Line 13: | ||
# A collection of Gerber files (and a text file) to send to Bay Area Circuits (or another PCB manufacturer) | # A collection of Gerber files (and a text file) to send to Bay Area Circuits (or another PCB manufacturer) | ||
# A smaller collection of Gerber files to send to OSHStencils | # A smaller collection of Gerber files to send to OSHStencils | ||
| − | # An Excel spreadsheet to upload to Digikey (or manually order from other vendors) | + | # An Excel spreadsheet (called a Bill of Materials, or BoM) to upload to Digikey (or manually order from other vendors) |
Luckily, we have a system for producing all of the above! Enter the '''outjob'''. | Luckily, we have a system for producing all of the above! Enter the '''outjob'''. | ||
| Line 25: | Line 25: | ||
Master copies of the outjobs are in the SVN at {{svn-repo|altium-core/libraries/outjobs}}. Outjobs are also automatically included in the PCB project templates at {{svn-repo|altium-core/libraries/templates}}. If you didn't start from a project template (doing so next time will make your life easier), '''make a copy''' of the outjob you want to use and paste it into your project folder. Making a copy is important so that your project doesn't break on other people's computers or as people update the master copies of the outjobs (which your board may not be properly configured for). '''Make sure to pick the outjob that correspond's with your board's layer count. SSI.OutJob is for 2-layer boards, and SSI-4-LAYER.OutJob is for 4-layer boards. Picking the wrong outjob may result in your board coming back without the inner layers it should have or with two extra inner layers.''' Once you've copied the outjob, in the Projects pane in Altium, right click your project and select "Add Existing to Project" and in the window that comes up, select your copy of the outjob. You should now see a "Settings" folder under your project in the Projects pane with an "Output Jobs" folder within it (see right). | Master copies of the outjobs are in the SVN at {{svn-repo|altium-core/libraries/outjobs}}. Outjobs are also automatically included in the PCB project templates at {{svn-repo|altium-core/libraries/templates}}. If you didn't start from a project template (doing so next time will make your life easier), '''make a copy''' of the outjob you want to use and paste it into your project folder. Making a copy is important so that your project doesn't break on other people's computers or as people update the master copies of the outjobs (which your board may not be properly configured for). '''Make sure to pick the outjob that correspond's with your board's layer count. SSI.OutJob is for 2-layer boards, and SSI-4-LAYER.OutJob is for 4-layer boards. Picking the wrong outjob may result in your board coming back without the inner layers it should have or with two extra inner layers.''' Once you've copied the outjob, in the Projects pane in Altium, right click your project and select "Add Existing to Project" and in the window that comes up, select your copy of the outjob. You should now see a "Settings" folder under your project in the Projects pane with an "Output Jobs" folder within it (see right). | ||
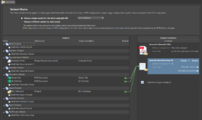
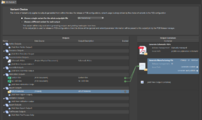
| − | Once you have the outjob in your project and are ready to export files, open the outjob by double-clicking on it from the Projects pane. | + | Once you have the outjob in your project and are ready to export files, open the outjob by double-clicking on it from the Projects pane. This will produce a screen like the first one below: |
| + | |||
| + | <gallery mode="slideshow" widths=750px> | ||
| + | File:outjob.png|OutJob configured for all outputs | ||
| + | File:outjob_no_BOM.png|OutJob configured to skip BoM generation | ||
| + | </gallery> | ||
| + | |||
| + | This outjob has the "Generate Manufacturing Files" option selected on the right side and has all three outputs - Gerbers, a drill file, and an Excel bill of materials - enabled. From here, either click the "Generate content" button under "Generate Manufacturing Files" or hit the F9 key, and Altium will produce output files (yes, it is that simple!). Outputs will be placed in your project folder inside of a new subfolder called "Fabrication Outputs." Generating all of the output files takes generally about 1 minute. | ||
| + | |||
| + | If you're in a hurry (BoM generation takes about 75% of the output file generation time) or for some other reason just want to generate Gerber and drill files and not an Excel BoM, you can disable BoM generation by clicking the little numbered circle in the Bill of Materials row. Your screen will look like the second image in the above slideshow with BoM generation disabled. To reenable BoM generation, just click the circle again. | ||
Revision as of 08:07, 8 October 2018
 |
This is a guide Welcome! This article is intended to guide you through an SSI process. While its authors have made efforts to make it useful, if you have questions, please ask the authors on Slack. They will be able to both help you and improve this resource for future SSI-ers. This article was written by Sasha Maldonado ( |
|---|
All done with your PCB? Time to get it sent out for manufacturing and to order components and a stencil!
Wait, What? I Thought I Was Done!

PCB manufacturers require special files in order to actually make circuit boards. These files describe where to place and remove copper on each layer of the board, where to drill holes, and where to expose copper and draw artwork on the outsides of the board. There are several different formats that manufacturers will accept; for SSI's leading manufacturer (Bay Area Circuits, one of our oldest and most supportive sponsors), we export Gerber files, which are machine-readable descriptions of what should be manufactured on each layer of the board. You'll also export a plain text file with coordinates for drilled holes (and what size drill bit to drill them with). These are the files required for a manufacturer like Bay Area Circuits to actually create a PCB.
Your PCB, however, will ship from the manufacturer without any components attached. If, as in most cases, you're assembling a board yourself, you'll (usually) need two additional things: components, which we generally buy from Digikey (but sometimes elsewhere, as needed - see Recommended PCB Component Suppliers if you're curious); and a stencil to help apply solder paste to your board for attaching components, which we usually buy from OSHStencils. Digikey accepts Excel spreadsheets specifying the type and number of components needed to build your board, and OSHStencils uses aforementioned Gerber files to laser cut either polyimide (Kapton) film or thin stainless steel.
To recap, you will need three things:
- A collection of Gerber files (and a text file) to send to Bay Area Circuits (or another PCB manufacturer)
- A smaller collection of Gerber files to send to OSHStencils
- An Excel spreadsheet (called a Bill of Materials, or BoM) to upload to Digikey (or manually order from other vendors)
Luckily, we have a system for producing all of the above! Enter the outjob.
SSI.OutJob

There are a number of things to configure to get Altium to correctly output Gerbers and other files. These have been fortunately taken care of and saved in a special Altium file called an outjob. You'll need to add the outjob file to your project (as if it were a schematic file), and will then be able to output files for fabrication with a couple of clicks.
Master copies of the outjobs are in the SVN at ![]() altium-core/libraries/outjobs
altium-core/libraries/outjobs![]() altium-core/libraries/templates
altium-core/libraries/templates
Once you have the outjob in your project and are ready to export files, open the outjob by double-clicking on it from the Projects pane. This will produce a screen like the first one below:
OutJob configured for all outputs
OutJob configured to skip BoM generation


This outjob has the "Generate Manufacturing Files" option selected on the right side and has all three outputs - Gerbers, a drill file, and an Excel bill of materials - enabled. From here, either click the "Generate content" button under "Generate Manufacturing Files" or hit the F9 key, and Altium will produce output files (yes, it is that simple!). Outputs will be placed in your project folder inside of a new subfolder called "Fabrication Outputs." Generating all of the output files takes generally about 1 minute.
If you're in a hurry (BoM generation takes about 75% of the output file generation time) or for some other reason just want to generate Gerber and drill files and not an Excel BoM, you can disable BoM generation by clicking the little numbered circle in the Bill of Materials row. Your screen will look like the second image in the above slideshow with BoM generation disabled. To reenable BoM generation, just click the circle again.