Sequoia structures: Difference between revisions
| Line 13: | Line 13: | ||
[[File:Deriving_parts2.png|600px]] | [[File:Deriving_parts2.png|600px]] | ||
You can now click on the star icons on the left side of each of the global parameters. After clicking the icons the global parameters will show in the favorites table and you will be able to reference them by name. | You can now click on the star icons on the left side of each of the global parameters. After clicking the icons the global parameters will show in the favorites table and you will be able to reference them by name.(Note: this is optional but recommended because it enables autocorrect, otherwise you have type in the full name of the parameter) | ||
[[File:Deriving_parts3.png|600px]] | [[File:Deriving_parts3.png|600px]] | ||
Revision as of 17:51, 13 September 2020
Looking for Structures Onboarding?
Head over to this page!
Designing Parts: A Simple Workflow
First off, enter the Sequoia project on Fusion SSI team. This can be done by clicking your name in the upper left hand corner, after which a dropdown menu should appear. Select Stanford Student Space Initiative and then enter Sequoia Satellite.
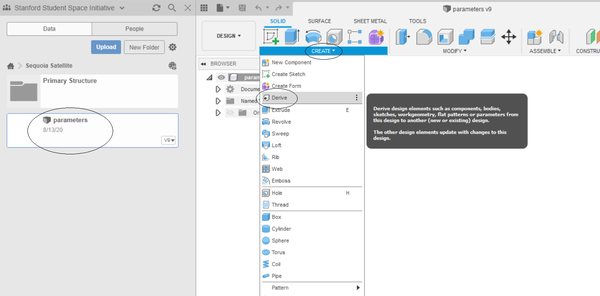
Now, you should see some files and some folders. We are interested in the 'parameters' to begin with. It contains satellite-wide dimensions (for example, rail dimensions and spacing, material thickness, and more) which any new part will need access to. To make a new file with access to these dimensions, open the parameters file, open the create menu and hit derive.
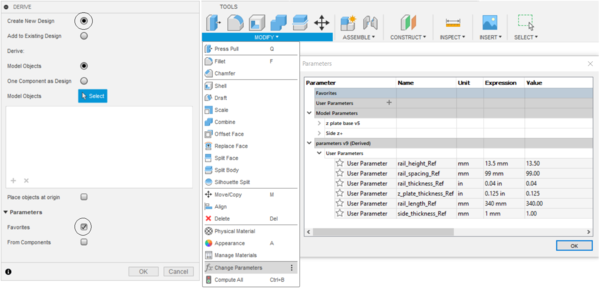
This will open up a dialogue asking what to derive to where. We will be creating a new part and copying over the parameters; select the same options as below. After hitting okay, it will open an empty, untitled file. However, if hit 'modify' then 'change parameters', it will open a dialogue which shows the imported global parameters after expanding the menu.
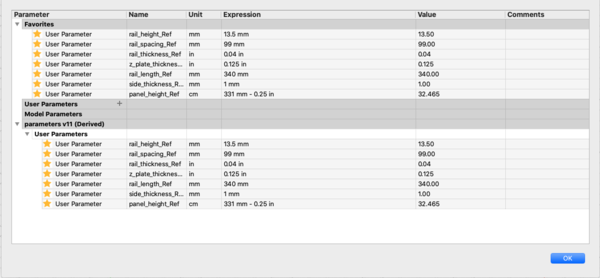
You can now click on the star icons on the left side of each of the global parameters. After clicking the icons the global parameters will show in the favorites table and you will be able to reference them by name.(Note: this is optional but recommended because it enables autocorrect, otherwise you have type in the full name of the parameter)
Now, hack away and CAD up a new part! The global parameters can be used by simply typing in a dimension's name (with an appended _Ref) (with an equation if you like) (ex: 3 * rail_height_Ref). After that, save it in an appropriate subdirectory and it will automatically appear for everybody else.
Sometimes, you may wish to make a part which is derived from another. In this case, open the file which acts as a base, and open the derive menu again. This time, under the Deriving selection, choose 'one component as design', and click on the part. It will also create a new file, but this time with the base geometry in it. As the base file gets updated, the derived part will too.
Details
There are a few important design features which anything we create should be abide by.
- Anything we make needs to be easily manufacturable. Practically, this means we should try to keep our parts either 3D printed (almost any geometry will fly, but the materials won't be as strong) or simple to make from metal. For the latter, this practically means machined from stock with only operations like drilling/milling holes or other shapes which can be cut with a standard 3 axis mill. If what that means is unclear, feel free to ping Connor and check out parts of the primary structure.


